
VMware has announced the vSphere 6.5 last year with the ESXi 6.5, vCenter 6.5 & other products with the latest version. vCenter 6.5 includes the some of the new features for the high availability & encryption. vCenter 6.5 is available now so i thought to post the article about it so that if any one want to install it on your LAB or in server they can easily install it. In our previous post we have seen on How to install vCenter Server Appliance 6.5 Step by step so in this post we will be working on Windows based vCenter Server 6.5 step by step. If you have missed the article on installing VCSA 6.5 then check below link.
How to Install VCSA 6.5 Step by Step ?
So let’s start with the Installation of vCenter Server 6.5. You will require windows server in order to install vCenter Server.
Step 1:
Download & Mount the ISO to the server.

Step 2:
Run the file “Autorun” to start the vCenter Installer.

Step 3:
VMware vCenter Installer starts here.
Click Install to proceed with Installation.

Step 4:
Click Next to start the Installation process.

Step 5:
Accept the license agreement & click Next to proceed.

Step 6:
Choose the Type of deployment as per your requirement.
We are going with default Embedded Deployment which will install vCenter Server with Embedded Platform service controller in a single machine.
Click Next to proceed.

Step 7:
You have to provide the system name which will be used to access the vCenter Server.
You can use either IP address or FQDN. It is recommended to use the FQDN.
Click Next to proceed.

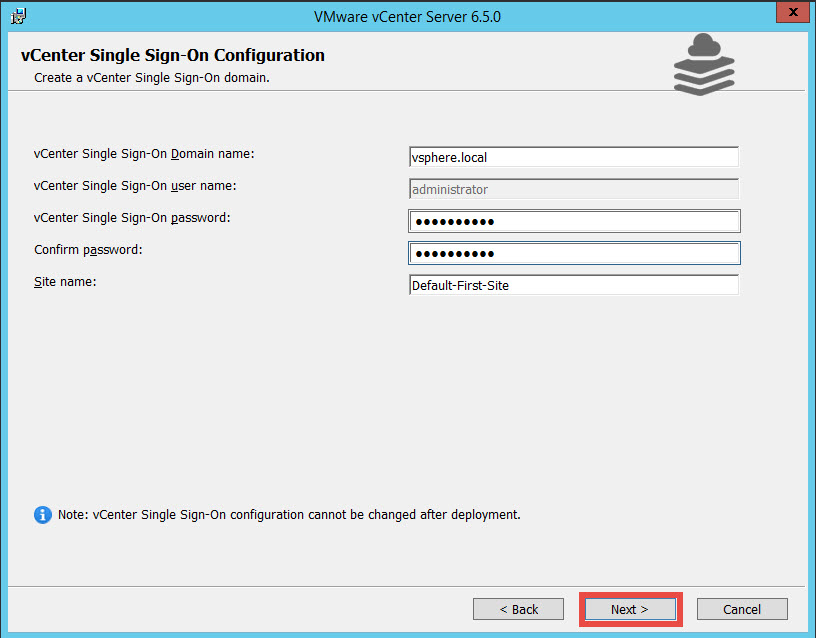
Step 8:
Here we will be configuring Single Sign-On for vCenter server.
Choose the Domain name for vCenter Single Sign-On & Set the password for the default user “administrator”.
Click Next to proceed.
Step 9:
Specify the Service Account to be used by vCenter Server.
You can choose the local system account or specify different account.
Click Next to proceed.

Step 10:
Provide the Database for vCenter Server.
vCenter Server uses Database to store it’s inventory data.
You can use embedded postgres database or use external database. External database supported are Oracle or Microsoft SQL Server.
Click Next to proceed.

[adinserter block=”3″]
Step 11:
You will have to open the network ports for vCenter Server.
vCenter Server uses below ports for communication.
Check & verify all the ports are opened.
Click Next to proceed.

Step 12:
Set the Destination Directory where the Installation data of the vCenter will be stored.
You can either go with default which is system drive or you can change it if you want.
Click Next to proceed.

Step 13:
This is optional step.
You can join the VMware customer Experience Improvement program or Click Next to proceed.

Step 14:
We are ready to start the installation.
Check & verify all the configuration.
Click Install to start the installation.

Step 15:
It will take 30-45 minutes to complete the installation depending on your environment.

Now you can see that installation is completed successfully.
You can launch the vSphere Web client from here directly.
Click Finish to close the installer.

This is the vCenter Server 6.5 Web Client.
It looks almost similar to previous one but it adds some of the changes & new improvements.
Now you can easily install the vCenter Server 6.5 in your LAB or in your server.
You can access the newly deployed the vCenter Server 6.5 using vSphere Web client by the IP address or Hostname you have used. Just put the Hostname or IP in your browser.
For e.g
https://IP or Hostname:443/vsphere-client/
You can also view the Appliance getting started page by the same.
For e.g
https://IP or Hostname:443
Checkout Our Posts on vSphere 6.5:
How to Install ESXi 6.5 Step by Step ?
How to Install VCSA 6.5 Step by Step ?
Checkout Our Posts on vSphere 6.5 Upgrade Series:
How to Upgrade ESXi 6 to ESXi 6.5 Step by Step ?
How to Upgrade VCSA 6 to VCSA 6.5 Step by Step ?
How to Upgrade vCenter Server 6 to vCenter Server 6.5 Step by Step ?
How to Migrate vCenter Server 6 to VCSA 6.5 Step by Step ?
How to Update or Patch VCSA 6.5 Step by Step ?
That’s it for Today Friends. I Hope you liked reading this post & If you find anything more to be added or removed feel free to write it in our comments. If you find it useful You are Feel free to share this on social media to help others & spread knowledge.
If you have any query on any thing you are free to write it in our comments section & we will make sure to provide you the better solution as soon as possible.
Join Our LinkedIn Group to get Updates & Discussions : Mastering VMware.
Checkout our Facebook Group for discussions & more.
You can also Like & Share our Facebook Page for Latest Updates.


One tip if you encounter an error during installation. This happened to us so will share it here.
We were receiving an error code 1603 at the where it was uninstalling the vcsmanager.. talking with the support they had us try numerous thing and were pointing to an issue with one of the java package…
To make it short It wasn’t..
the issue was that we had installable a Broadcom addon to our vsphere and that was what was preventing the installation.
Make sure to either stopor remove all addon services before performing the installation/upgrade
Hope this helps someone
Regards
@Carlos Martins
Thanks for your views.
Nice blog. I understood the concept very well. This blog is very informative. And it’s very interesting topic.
Thanks Nitin Rawat.